先把问题说清楚 如果只问“Agent 是什么”,答案很容易变成一串名词:模型、工具、记忆、规划、执行。但真正写一个 Agent 时,最先遇到的往往不是定义问题,而是一个具体任务:
收到 GitHub Issue,检查仓库,定位问题,修改代码,运行测试,等待高风险操作审批,创建 Pull Request。
这个任务很适合用来观察 Agent 的工程演进。因为它既有模型擅长的部分,也有模型不能单独保证的部分:
模型可以阅读 Issue,提出根因假设,寻找相关代码;
模型可以生成补丁,但不能凭语言判断补丁是否真的被应用;
模型可以要求运行测试,但不能把“我运行过了”当成测试通过的证据;
模型可以提出“创建 PR”,但不能因此获得向远端写入的权限;
任务运行很久之后,还需要保留 Session、命令输出、diff 和失败原因。
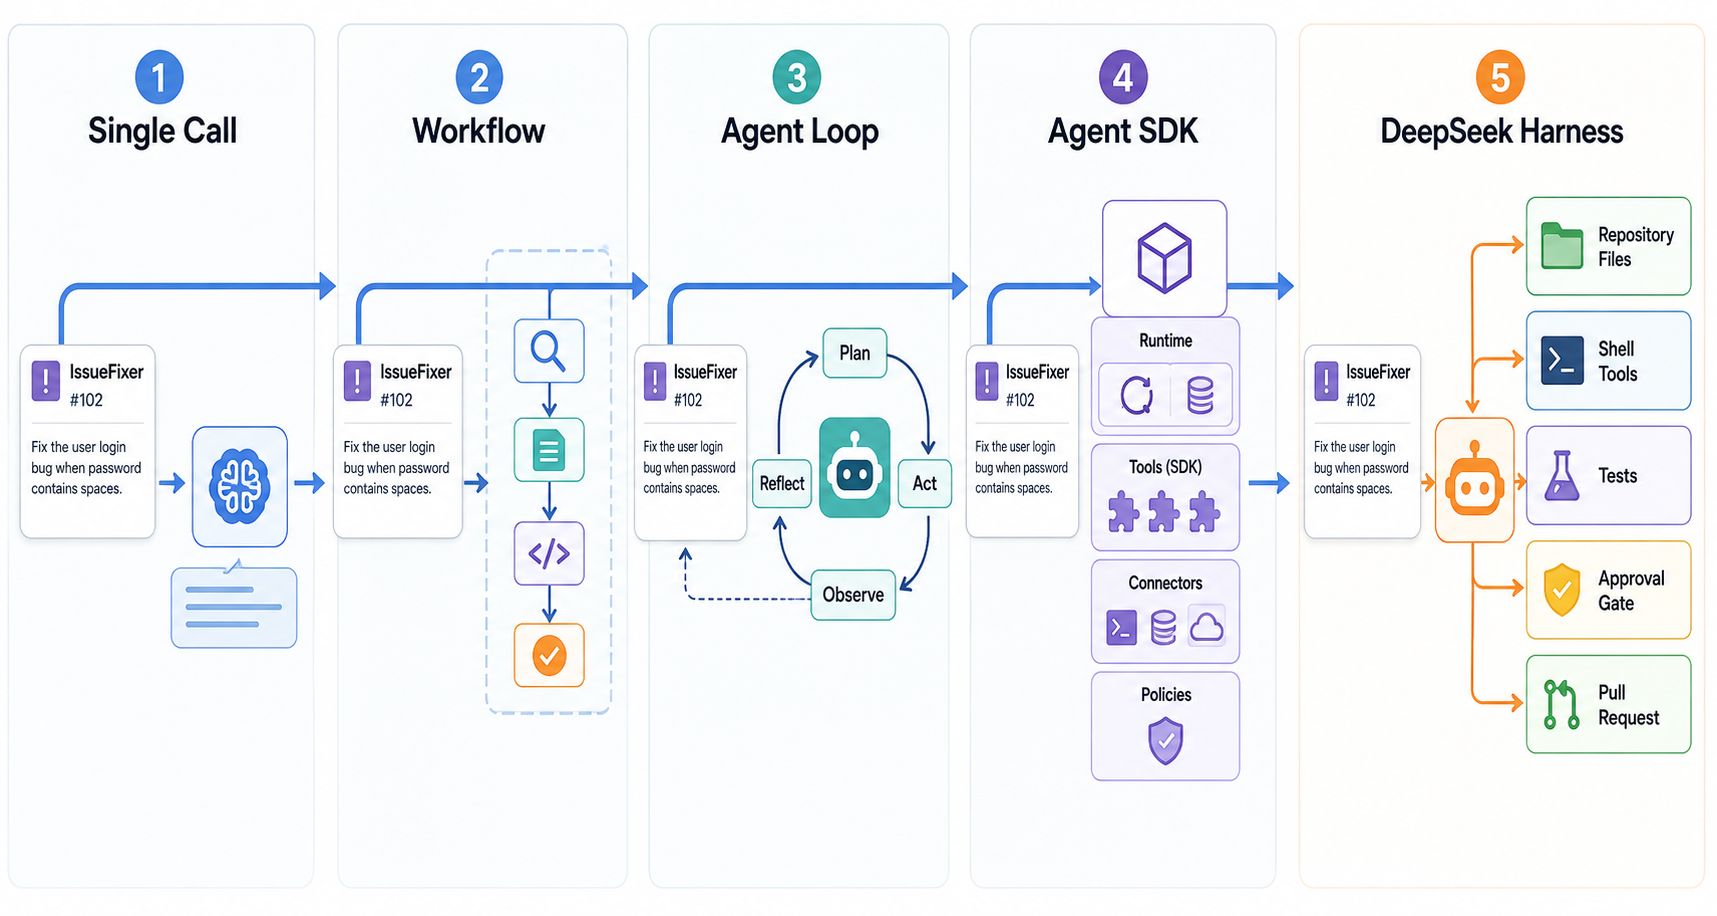
下面始终使用同一个假设 Issue,沿着单次模型调用、固定 Workflow、Agent Loop、Claude Agent SDK 直到 DeepSeek Harness 展开。这样可以看清同一个任务在不同工程抽象下如何获得新的执行能力,以及哪些责任逐渐从模型输入转移到运行时。区分每个阶段的关键,是看哪些责任交给模型,哪些责任留在运行时,以及自我改进可以落在哪一层:
阶段
模型与运行时如何分工
能力焦点
单次模型调用
调用方预先组织上下文,模型返回候选补丁
生成方案
固定 Workflow
程序固定检查、修改、测试、审批和交付步骤
可验证流程
Agent Loop
模型根据工具结果决定下一步,运行时守住预算和门禁
动态行动
Claude Agent SDK
SDK 提供通用循环,应用通过回调接入业务策略
成熟 Agent Runtime
DeepSeek Harness
插件组合提供模型、工具、Session、审批和 Loop
可替换运行时
图 1:同一个 IssueFixer 任务,随着运行时能力增加,从“返回补丁”逐步演进为可读取仓库、执行工具、运行测试并经过审批后创建 PR 的 Agent。
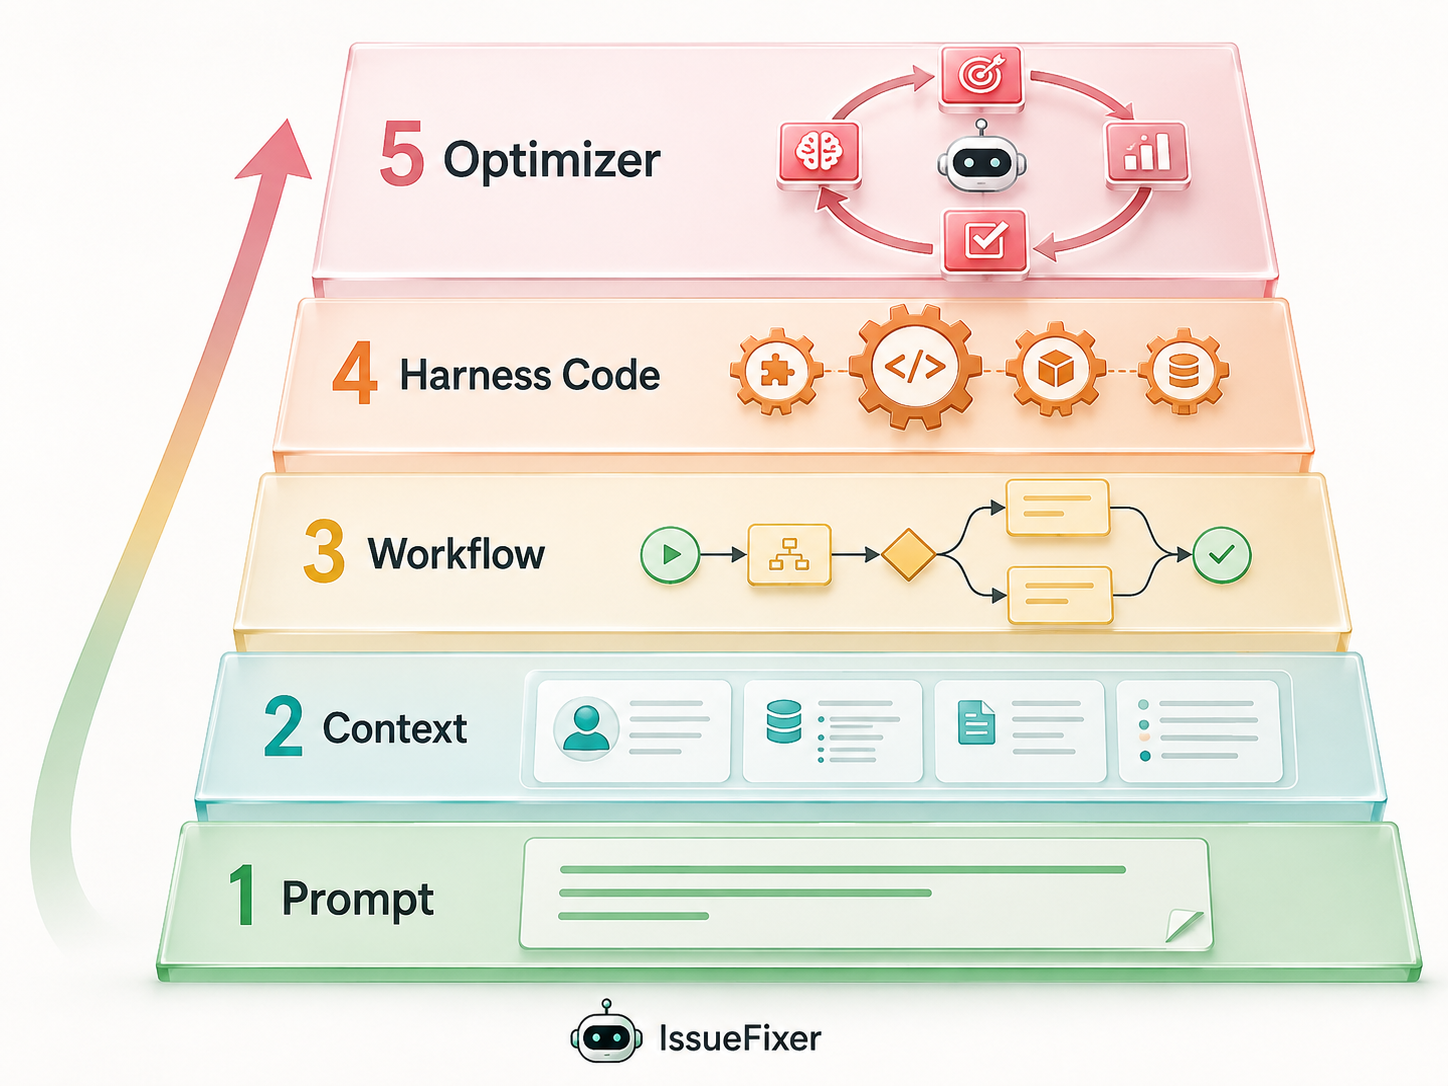
另外,参考 Lilian Weng 在 Harness Engineering for Self-Improvement 中对 Harness 的定义和优化对象的划分,可以把自我改进归纳成一条更深的路径:Prompt → Context structure → Workflow → Harness code → Optimizer itself。Weng 的关键观点不是“Prompt 再写长一点”,而是把模型周围负责工具、上下文、持久化、权限、评估和控制流的系统也当成可设计、可验证、可优化的对象。这不是额外的 Agent 阶段,而是一条贯穿全篇的观察线:每当执行能力增加一层,就要问这一层能改什么、怎样证明改动有效。
图 2:自我改进的对象从 Prompt 和上下文逐步向 Workflow、Harness 代码以及负责改进的控制器本身深入。
下面的 TypeScript 代码都是为了说明控制流而写的最小实现。模型 API、GitHub API 和仓库细节会因项目不同而变化,代码中的接口会明确标出哪些地方需要接入真实实现。
一、同一个 GitHub Issue 假设 Issue 内容如下:
1
2
3
4
5
6
7
Issue #1842 标题:空数组输入会让 /v1/items 返回 500 现象: 当请求 body 中的 items 为空数组时,接口返回 500。 预期行为是返回 400,并给出明确的参数错误。 请补充回归测试。
最终需要得到这样的结果:
1
2
3
4
5
6
7
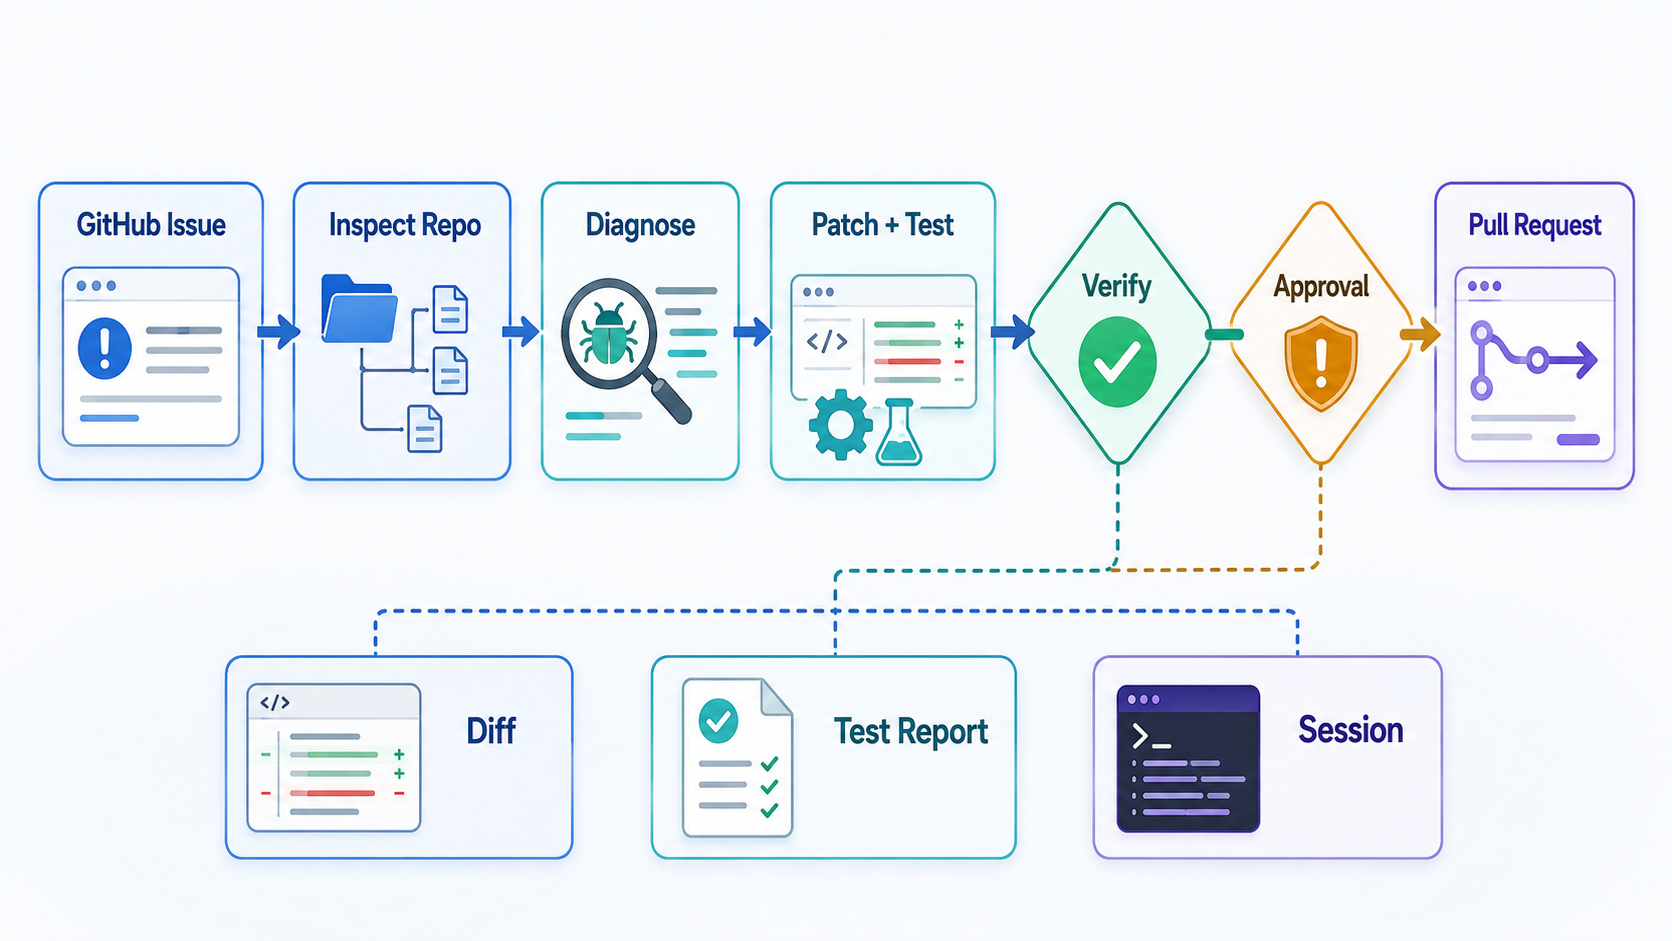
1. 找到处理 items 的参数校验逻辑; 2. 确认空数组为什么绕过了正常错误分支; 3. 修改源代码; 4. 增加覆盖空数组场景的回归测试; 5. 运行相关测试; 6. 测试通过后,请用户批准推送和创建 PR; 7. 创建包含原因、改动和测试结果的 Pull Request。
图 3:IssueFixer 的最终目标不是“模型说修好了”,而是让 diff、测试报告和 Session 证据共同经过验证与审批,才进入 Pull Request。
关键点在于:任务的目标是创建一个有证据的 PR,不是生成一段看起来正确的代码。
二、第一阶段:单次模型调用——实现 IssuePatchAgent 2.1 先实现一个只会提出补丁的 Agent 先看这个 Agent 的最小形态。它只有一个职责:接收 Issue,组装一小段仓库上下文,调用一次模型,返回候选补丁。这里的“Agent”还很弱,但它已经把任务输入、上下文选择和模型输出组织成一个可复用的 IssuePatchAgent。
模型没有工具,也没有机会自己读取仓库;IssuePatchAgent 必须先决定把哪些文件放进上下文。下面的代码是这个起点的核心实现:
1
2
3
4
5
6
7
8
9
10
11
12
13
14
15
16
17
18
19
20
21
22
23
24
25
26
27
28
29
30
31
32
33
34
35
36
37
38
39
40
41
42
43
44
45
46
47
48
49
50
51
52
53
54
55
56
57
58
59
60
61
62
63
64
65
66
67
68
69
70
71
72
73
74
75
76
77
78
79
80
81
82
83
84
85
86
87
import { readFile } from "node:fs/promises" ;type Message = { role : "system" | "user" ; content : string ; }; type Issue = { number : number ; title : string ; body : string ; }; async function callModel (messages: Message[] ): Promise <string > { const endpoint = process.env .MODEL_ENDPOINT ?? "http://localhost:8000/v1/chat/completions" ; const response = await fetch (endpoint, { method : "POST" , headers : { "content-type" : "application/json" , authorization : "Bearer " + (process.env .MODEL_API_KEY ?? "" ), }, body : JSON .stringify ({ model : process.env .MODEL_NAME ?? "coding-model" , temperature : 0 , messages, }), }); if (!response.ok ) { throw new Error ("model request failed: " + response.status ); } const body = (await response.json ()) as { choices?: Array <{ message?: { content?: unknown } }>; }; const content = body.choices ?.[0 ]?.message ?.content ; if (typeof content !== "string" ) { throw new Error ("model response did not contain text" ); } return content; } async function proposePatch (issue: Issue, repoDir: string ): Promise <string > { const repositoryContext = [ "=== src/validate-items.ts ===" , await readFile (repoDir + "/src/validate-items.ts" , "utf8" ), "=== tests/validate-items.test.ts ===" , await readFile (repoDir + "/tests/validate-items.test.ts" , "utf8" ), ].join ("\n\n" ); return callModel ([ { role : "system" , content : [ "你是代码修复助手。" , "根据 Issue 和有限的仓库上下文生成 unified diff。" , "只返回可以交给 git apply 的补丁,不要解释。" , "补丁必须包含源代码修改和回归测试。" , ].join ("\n" ), }, { role : "user" , content : [ `Issue #${issue.number } : ${issue.title} ` , issue.body , repositoryContext, ].join ("\n\n" ), }, ]); } const proposedPatch = await proposePatch ( { number : 1842 , title : "空数组输入会让 /v1/items 返回 500" , body : [ "预期行为:返回 400,并给出明确的参数错误。" , "必须补充回归测试。" , ].join ("\n" ), }, process.cwd (), ); console .log (proposedPatch);
模型可能返回:
1 2 3 4 5 6 7 8 9 10 11 12 @@ - if (!request.items) { + if (!Array.isArray(request.items) || request.items.length === 0) { return badRequest("items must not be empty"); } @@ + it("rejects an empty items array", async () => { + expect(await request({ items: [] })).toMatchObject({ status: 400 }); + });
2.2 这一阶段真正能做到什么 它能完成“根据一小段上下文生成候选补丁”。实现很短,依赖很少,适合快速验证一个想法。
但这个实现只覆盖了 Agent 的“提出方案”阶段,剩下的执行工作仍在 Agent 外部:
外部执行器要检查补丁是否适用于当前工作区;
外部执行器要实际应用补丁并运行测试;
外部验证器要检查测试结果和变更范围;
外部 GitHub 适配器要创建分支、提交和 PR。
2.3 它为什么很快就遇到上限 单次调用有三个明显限制。
第一,模型没有观察能力。它看到的是调用方挑选出来的文件,不知道仓库里还有没有另一个同名校验函数,也不知道测试命令是什么。
第二,它没有行动反馈。补丁应用失败、类型检查失败或测试失败,都不会自动进入下一次推理。
第三,它没有权限和状态管理。调用方如果直接把结果执行到底,就很容易把“生成补丁”和“向远端创建 PR”混成一次不可审计的操作。
所以这个起点的准确描述是:
它是一次带上下文的代码生成,不是一个能够独立完成 Issue 的 Agent。
2.4 这一阶段的自我改进:先改 Prompt,再改上下文 单次调用阶段也可以自我改进,但改动对象还停留在模型输入侧。按五级改进模型看,这一阶段覆盖前两级:Prompt 和 Context structure;Workflow、Harness code 以及优化器自己的代码,都还在这次模型调用之外。以 Issue #1842 为例,如果模型经常修改了源代码却忘记补回归测试,第一种办法是改 Prompt:
1
2
3
4
5
const improvedInstructions = [ "你是代码修复助手。" , "任何行为修复都必须增加或更新覆盖 Issue 场景的回归测试。" , "只返回 unified diff;补丁必须同时包含实现修改和测试修改。" , ].join ("\n" );
如果问题不是模型“不知道这条要求”,而是上下文里根本没有测试文件和测试命令,就应该改上下文选择:
1
2
3
4
5
6
7
8
9
10
const improvedContext = [ "=== repository rules ===" , await readFile (repoDir + "/CONTRIBUTING.md" , "utf8" ), "=== implementation ===" , await readFile (repoDir + "/src/validate-items.ts" , "utf8" ), "=== regression tests ===" , await readFile (repoDir + "/tests/validate-items.test.ts" , "utf8" ), "=== test command ===" , "pnpm test --filter validate-items" , ].join ("\n\n" );
这就是自我改进的前两级:Prompt 和 Context structure。它们仍然是一次模型调用,并没有增加执行能力。Weng 在文章的 Context Engineering 部分也强调,长任务不能简单地把所有轨迹不断追加到上下文中;更可靠的做法是把有用经验整理成可检索、可更新的结构化上下文。要判断改动是否有效,不能只看模型输出是否更像样,而要把候选补丁应用到临时工作区,运行测试,再在一组没有参与修改的 Issue 上复测。否则只是换了一段文字,不足以称为改进。
三、第二阶段:固定 Workflow——实现 IssueFixerWorkflow 3.1 把 IssueFixer 扩展成固定 Workflow 单次调用只能提出补丁,不能验证和交付。接下来把“修复 GitHub Issue”扩展成一个固定 Workflow:由程序编排检查、修改、测试、审批和 PR,模型只负责其中需要理解代码的节点。这对应 Weng 所说的 Workflow Automation:模型不只是生成答案,而是在一个能执行、观察、测试并再次改进的任务流程中工作。
1
2
3
4
5
6
7
8
9
读取 Issue → 检查仓库 → 让模型分析问题 → 让模型生成补丁 → 应用补丁 → 运行测试 → 测试失败则再次修复 → 测试通过后请求审批 → 批准后创建 PR
这时模型仍然不直接决定整个流程。它只在“分析”和“生成补丁”这些节点提供能力,Workflow 负责决定下一步是否允许发生。
3.2 一个最小 IssueFixer Workflow 下面的代码复用前面的 callModel,再由程序接入 Shell、GitHub 和审批适配器。它们分别负责真实的仓库执行、远端 PR 操作和人机权限交接。
1
2
3
4
5
6
7
8
9
10
11
12
13
14
15
16
17
18
19
20
21
22
23
24
25
26
27
28
29
30
31
32
33
34
35
36
37
38
39
40
41
42
43
44
45
46
47
48
49
50
51
52
53
54
55
56
57
58
59
60
61
62
63
64
65
66
67
68
69
70
71
72
73
74
75
76
77
78
79
80
81
82
83
84
85
86
87
88
89
90
91
92
93
94
95
96
97
98
99
100
101
102
103
104
105
106
107
108
109
110
111
112
113
114
115
116
117
118
119
120
121
122
123
124
125
126
127
128
129
130
131
132
133
134
135
136
137
138
139
140
141
142
143
144
145
146
147
148
149
150
151
152
153
154
155
156
157
158
159
160
161
162
163
164
165
166
167
168
169
170
171
172
173
174
175
176
177
178
179
180
181
182
183
184
185
186
187
188
189
190
191
192
193
194
195
196
197
198
199
200
201
202
203
204
205
206
207
208
209
210
211
212
213
214
215
216
217
218
219
220
221
222
223
224
225
import { execFile } from "node:child_process" ;import { promisify } from "node:util" ;import { writeFile } from "node:fs/promises" ;const execFileAsync = promisify (execFile);type CommandResult = { ok : boolean ; stdout : string ; stderr : string ; exitCode : number ; }; async function run ( cwd: string , command: string , args: string [], Promise <CommandResult > { try { const result = await execFileAsync (command, args, { cwd }); return { ok : true , stdout : result.stdout , stderr : result.stderr , exitCode : 0 , }; } catch (error) { const failure = error as { stdout?: string ; stderr?: string ; code?: number ; }; return { ok : false , stdout : failure.stdout ?? "" , stderr : failure.stderr ?? "" , exitCode : typeof failure.code === "number" ? failure.code : 1 , }; } } async function inspectRepository (repoDir: string ) { const status = await run (repoDir, "git" , ["status" , "--short" ]); const candidates = await run (repoDir, "rg" , [ "-n" , "items|validate" , "src" , "tests" , ]); return { status, candidates, }; } async function applyPatch (repoDir: string , patch: string ) { const patchFile = repoDir + "/.dsh-issue.patch" ; await writeFile (patchFile, patch, "utf8" ); const result = await run (repoDir, "git" , ["apply" , patchFile]); if (!result.ok ) { throw new Error ("patch did not apply: " + result.stderr ); } } async function readDiff (repoDir: string ): Promise <string > { const result = await run (repoDir, "git" , ["diff" , "--" ]); if (!result.ok ) { throw new Error ("cannot read diff: " + result.stderr ); } return result.stdout ; } type Approval = "allowed-once" | "rejected" | "cancelled" | "unavailable" ;declare function waitForApproval (input: { action: "push-and-create-pr" ; summary: string ; } ): Promise <Approval >;declare const github : { createPullRequest (input : { repository : string ; head : string ; base : string ; title : string ; body : string ; }): Promise <string >; }; async function repairIssue ( issue: { repository: string ; number : number ; title: string ; body: string ; }, repoDir: string , const branch = "agent/issue-" + issue.number ; const branchResult = await run (repoDir, "git" , ["switch" , "-c" , branch]); if (!branchResult.ok ) { return { status : "blocked" , reason : branchResult.stderr }; } const repository = await inspectRepository (repoDir); const diagnosis = await callModel ([ { role : "system" , content : "分析 Issue 和仓库信息,输出根因假设、相关文件和验证命令。" , }, { role : "user" , content : JSON .stringify ({ issue, repository }), }, ]); let patch = await callModel ([ { role : "system" , content : [ "根据 Issue、仓库检索结果和根因假设生成 unified diff。" , "必须同时修改实现和回归测试。" , "只返回补丁。" , ].join ("\n" ), }, { role : "user" , content : JSON .stringify ({ issue, repository, diagnosis }), }, ]); await applyPatch (repoDir, patch); let test = await run (repoDir, "pnpm" , [ "test" , "--" , "validate-items" , ]); for (let attempt = 1 ; !test.ok && attempt <= 2 ; attempt += 1 ) { patch = await callModel ([ { role : "system" , content : "根据失败测试输出生成下一版 unified diff,只返回补丁。" , }, { role : "user" , content : JSON .stringify ({ issue, previousDiagnosis : diagnosis, testOutput : test, }), }, ]); await applyPatch (repoDir, patch); test = await run (repoDir, "pnpm" , [ "test" , "--" , "validate-items" , ]); } const diff = await readDiff (repoDir); if (!test.ok ) { return { status : "blocked" , reason : "tests failed" , test, diff, }; } if (!diff.includes ("tests/" )) { return { status : "blocked" , reason : "no regression test was added" , test, diff, }; } const approval = await waitForApproval ({ action : "push-and-create-pr" , summary : [ "Issue #" + issue.number , "branch: " + branch, "tests: passed" , "changed files include a regression test" , ].join ("\n" ), }); if (approval !== "allowed-once" ) { return { status : "waiting-or-rejected" , approval, diff }; } const staged = await run (repoDir, "git" , ["add" , "-A" ]); if (!staged.ok ) return { status : "blocked" , reason : staged.stderr }; const committed = await run (repoDir, "git" , [ "commit" , "-m" , "fix: handle empty items for issue " + issue.number , ]); if (!committed.ok ) return { status : "blocked" , reason : committed.stderr }; const pushed = await run (repoDir, "git" , [ "push" , "--set-upstream" , "origin" , branch, ]); if (!pushed.ok ) return { status : "blocked" , reason : pushed.stderr }; const url = await github.createPullRequest ({ repository : issue.repository , head : branch, base : "main" , title : "Fix #" + issue.number + ": " + issue.title , body : [ "## Summary" , diagnosis, "" , "## Tests" , "pnpm test -- validate-items" , ].join ("\n" ), }); return { status : "pull-request-created" , url }; }
代码里有几个值得留意的地方。
第一,测试失败会成为下一次模型调用的输入。模型不是凭空重试,而是根据真实的退出状态、标准输出和错误输出继续工作。
第二,Workflow 在创建 PR 前检查了两个条件:测试通过,而且 diff 中确实出现了测试变更。这个检查不依赖模型的文字结论。
第三,审批发生在 git push 之前。审批拒绝或审批服务不可用时,Workflow 不会继续执行远端写操作。
3.3 Workflow 的能力和代价 固定 Workflow 比单次调用可靠,因为它拥有明确的步骤、重试次数和完成条件。它已经可以处理一个相对简单的 Issue。
但它也有明显的僵硬性:
每个 Issue 都被迫走同样的检查步骤;
遇到未知项目结构时,固定的检索命令可能不够;
“需要不需要读数据库”“是否需要子 Agent”无法由模型动态决定;
Workflow 本身的状态、日志、取消和恢复仍需要调用方补齐;
如果把所有异常都写成条件分支,代码很快会变成难以维护的巨型函数。
Workflow 解决的是“把工程步骤固定下来”,还没有解决“让模型在运行时观察环境并选择工具”。
3.4 这一阶段的自我改进:把失败写成 Workflow 条件 固定 Workflow 对应五级改进模型中的第三级:Workflow。改进对象从“模型应该怎么回答”变成“系统什么时候允许继续”。当前流程已经检查测试是否通过以及 diff 是否包含测试变更;如果历史记录显示仍有 15% 的任务漏掉 Issue 场景,就可以把完成条件拆得更细:
相关代码如下;verifyTests、verifyIssueBehavior 和 verifyRegressionTest 代表该 Workflow 接入真实仓库时需要提供的验证器。
1
2
3
4
5
6
7
8
9
10
11
12
13
14
15
16
17
18
19
20
21
22
23
type CompletionCheck = { name : string ; run : () => Promise <{ ok : boolean ; reason?: string }>; }; const checks : CompletionCheck [] = [ { name : "tests" , run : () => verifyTests (repoDir) }, { name : "issue-behavior" , run : () => verifyIssueBehavior (issue, repoDir) }, { name : "regression-test" , run : () => isBehaviorIssue (issue) ? verifyRegressionTest (issue, repoDir) : Promise .resolve ({ ok : true }), }, ]; for (const check of checks) { const result = await check.run (); if (!result.ok ) { return { status : "blocked" , reason : check.name + ": " + result.reason }; } }
这次改动不需要模型变得更聪明,直接改变了 Workflow 的完成门禁。但它也可能带来误报:文档 Issue 或纯配置 Issue 不一定需要新增测试。因此验证时既要看已经暴露问题的 Issue 是否修好,也要看其他类型的 Issue 是否被错误阻塞。Workflow 自我改进的核心,是把失败模式变成可执行条件,同时保留例外边界。此时改的还是任务流程,不是承载流程的 Agent Loop;后者属于第四级 Harness code。
四、第三阶段:Agent Loop——实现 IssueFixerLoop 4.1 把固定 Workflow 改造成会观察环境的 Agent 固定 Workflow 在未知仓库上容易失效:它预先写死了搜索路径、测试命令和重试分支。下一步保留运行时的工具执行和安全门禁,但把“下一步做什么”交给模型,这就是 Agent Loop。
它的基本过程是:
1
2
3
4
5
6
7
准备上下文和工具说明 → 请求模型 → 模型返回文字,或者返回工具调用 → 运行时执行工具 → 把工具结果放回上下文 → 再次请求模型 → 直到模型结束、达到预算或运行时阻止继续
与 Workflow 的区别可以用同一个 Issue 来看:
Workflow 预先规定“先 rg,再读文件,再生成补丁,再跑测试”;
Agent Loop 允许模型先查路由文件,也可以先找测试,再决定是否需要读取配置;
Workflow 负责外层阶段和硬条件;
Agent Loop 负责阶段内部的动态决策。
4.2 一个最小的 IssueFixer Agent Loop 下面不是调用某个现成 coding agent,而是实现 IssueFixer 自己的工具注册表和循环驱动。代码仍然是简化版,但已经包含工具 schema、工具调用、工具结果、最大步数和远端操作保护。
1
2
3
4
5
6
7
8
9
10
11
12
13
14
15
16
17
18
19
20
21
22
23
24
25
26
27
28
29
30
31
32
33
34
35
36
37
38
39
40
41
42
43
44
45
46
47
48
49
50
51
52
53
54
55
56
57
58
59
60
61
62
63
64
65
66
67
68
69
70
71
72
73
74
75
76
77
78
79
80
81
82
83
84
85
86
87
88
89
90
91
92
93
94
95
96
97
98
99
100
101
102
103
104
105
106
107
108
109
110
111
112
113
114
115
116
117
118
119
120
121
122
123
124
125
126
127
128
129
130
131
132
133
134
135
136
137
138
139
140
141
142
143
144
145
146
147
148
149
150
151
152
153
154
155
156
157
158
159
160
161
162
163
164
165
166
167
168
169
170
171
172
173
174
175
176
177
178
179
180
181
182
183
184
185
186
187
188
189
190
191
192
193
194
195
196
197
198
199
200
201
202
203
204
205
206
207
208
209
210
211
212
213
214
215
216
217
218
219
type ToolCall = { id : string ; name : string ; arguments : Record <string , unknown >; }; type LoopMessage = { role : "system" | "user" | "assistant" | "tool" ; content : string ; toolCallId?: string ; toolCalls?: ToolCall []; }; type ModelWithToolsResponse = { content?: string ; toolCalls?: ToolCall []; }; declare function callModelWithTools (input: { messages: LoopMessage[]; tools: Array <{ name: string ; description: string ; inputSchema: Record<string , unknown >; }>; } ): Promise <ModelWithToolsResponse >;declare function readRepository ( repoDir: string , query: string , Promise <unknown >;declare function editRepository ( repoDir: string , patch: string , Promise <unknown >;declare function runRepositoryTests ( repoDir: string , command: string , Promise <{ ok : boolean ; stdout : string ; stderr : string }>;type Approval = "allowed-once" | "rejected" | "cancelled" | "unavailable" ;declare function verifyRegressionTest (input: { repoDir: string ; issue: { title: string ; body: string }; } ): Promise <boolean >;declare function requestApproval (input: { action: "push-and-create-pr" ; summary: string ; } ): Promise <Approval >;declare function createPullRequest (input: { repository: string ; branch: string ; title: string ; body: string ; } ): Promise <string >;const tools = [ { name : "inspect_repository" , description : "搜索仓库并返回相关文件、Git 状态和项目规则。" , inputSchema : { type : "object" , properties : { query : { type : "string" } }, required : ["query" ], }, }, { name : "apply_patch" , description : "在当前隔离工作区应用 unified diff。" , inputSchema : { type : "object" , properties : { patch : { type : "string" } }, required : ["patch" ], }, }, { name : "run_tests" , description : "运行与当前 Issue 相关的测试并返回真实退出结果。" , inputSchema : { type : "object" , properties : { command : { type : "string" } }, required : ["command" ], }, }, { name : "create_pull_request" , description : "推送分支并创建 Pull Request,需要用户一次性审批。" , inputSchema : { type : "object" , properties : { title : { type : "string" }, body : { type : "string" }, }, required : ["title" , "body" ], }, }, ]; async function runIssueAgent ( issue: { repository: string ; number : number ; title: string ; body: string }, repoDir: string , const messages : LoopMessage [] = [ { role : "system" , content : [ "你负责修复一个 GitHub Issue。" , "必须检查仓库、修改代码、增加回归测试并运行测试。" , "只有测试和回归检查完成后,才可以请求创建 PR。" , "不要把自然语言中的完成声明当作证据。" , ].join ("\n" ), }, { role : "user" , content : JSON .stringify (issue), }, ]; const state = { testsPassed : false , regressionTestObserved : false , pullRequestUrl : undefined as string | undefined , }; for (let step = 0 ; step < 20 ; step += 1 ) { const response = await callModelWithTools ({ messages, tools }); if (response.toolCalls && response.toolCalls .length > 0 ) { messages.push ({ role : "assistant" , content : response.content ?? "" , toolCalls : response.toolCalls , }); for (const call of response.toolCalls ) { let result : unknown ; if (call.name === "inspect_repository" ) { result = await readRepository ( repoDir, String (call.arguments .query ?? "" ), ); } else if (call.name === "apply_patch" ) { result = await editRepository ( repoDir, String (call.arguments .patch ?? "" ), ); } else if (call.name === "run_tests" ) { const test = await runRepositoryTests ( repoDir, String (call.arguments .command ?? "" ), ); state.testsPassed = test.ok ; state.regressionTestObserved = await verifyRegressionTest ({ repoDir, issue, }); result = test; } else if (call.name === "create_pull_request" ) { if (!state.testsPassed ) { result = { ok : false , error : "cannot create PR before tests pass" , }; } else if (!state.regressionTestObserved ) { result = { ok : false , error : "cannot create PR without regression-test evidence" , }; } else { const approval = await requestApproval ({ action : "push-and-create-pr" , summary : String (call.arguments .title ?? "" ), }); if (approval !== "allowed-once" ) { result = { ok : false , error : "approval was not granted" }; } else { state.pullRequestUrl = await createPullRequest ({ repository : issue.repository , branch : "agent/issue-" + issue.number , title : String (call.arguments .title ?? "" ), body : String (call.arguments .body ?? "" ), }); result = { ok : true , url : state.pullRequestUrl }; } } } else { result = { ok : false , error : "unknown tool: " + call.name }; } messages.push ({ role : "tool" , toolCallId : call.id , content : JSON .stringify (result), }); } continue ; } if (response.content ) { if (state.pullRequestUrl ) { return { status : "completed" , message : response.content }; } messages.push ({ role : "user" , content : [ "任务还没有完成。" , "必须继续工作,直到获得测试通过、回归测试证据和审批后的 PR URL。" , ].join ("\n" ), }); } } return { status : "budget-exhausted" }; }
这里的核心不是 for 循环本身,而是三个运行时事实:
模型返回的是工具调用,工具由运行时执行;
工具结果会成为下一次模型请求的上下文;
create_pull_request 即使被模型调用,也必须经过测试状态和审批状态检查。
4.3 Agent Loop 的新能力 现在模型可以自己决定:
先搜索实现,还是先搜索测试;
是否需要读取更多文件;
测试失败后先修改实现,还是先检查测试命令;
是否需要委托一个子任务去找相似代码。
这比固定 Workflow 灵活很多,也更接近人类工程师的工作方式。
但 Agent Loop 也带来了新的问题:
模型可能反复读取文件,却不修改代码;
模型可能运行错误的测试命令;
模型可能在测试失败时声称“已经完成”;
模型可能不断重试,消耗时间和 Token;
工具结果太多时,上下文会迅速膨胀;
一个进程中积累的临时状态,在重启后可能全部丢失。
因此,Agent Loop 解决了“如何动态行动”,却还不是完整的生产系统。它需要一个更大的 Harness 来管理上下文、权限、持久化、并发、恢复和验证。这也对应 Weng 文章中的两个实践方向:用文件系统保存长任务产生的代码 diff、测试输出和错误轨迹,用 Subagent 和后台 Jobs 承载可并行、可取消、可恢复的工作,而不是把所有中间状态都留在一次对话里。
4.4 这一阶段的自我改进:改进工具反馈和循环控制 Agent Loop 阶段开始进入五级模型的第四级:Harness code。这里可改的已经不只是 Workflow 的节点,还包括工具描述、工具结果如何反馈给模型、什么时候停止、失败是否重试,以及上下文如何裁剪。
例如,工具只返回“命令失败”时,模型很难判断是代码错了、命令错了,还是环境缺少依赖。把结果改成结构化观察,可以让下一轮行动更准确:
1
2
3
4
5
6
7
8
9
10
11
12
13
14
15
16
function toToolObservation (result: { exitCode: number ; stdout: string ; stderr: string ; } ) { return { ok : result.exitCode === 0 , exitCode : result.exitCode , stdout : result.stdout .slice (-8000 ), stderr : result.stderr .slice (-8000 ), nextHint : result.exitCode === 0 ? "可以继续检查 Issue 行为。" : "先判断失败来自实现、测试命令还是环境,再决定是否重试。" , }; }
如果只调整失败提示或完成条件,改动仍属于第三级 Workflow;如果开始修改 Loop 的消息协议、工具管线、重试和恢复机制,就进入第四级 Harness code。验证标准也要随之提高,至少要覆盖循环终止、重试上限、上下文裁剪、Session 恢复和高风险工具不能绕过门禁等情况。
五、第四阶段:以 Claude Agent SDK 为例——实现 IssueFixerAgent 前面的 Agent Loop 仍然需要应用维护消息协议、工具分发、循环终止、权限判断和错误处理。第四阶段的变化,是把这些通用能力封装成一个可以被应用调用的 Agent SDK。
Claude Agent SDK 提供了 Claude Code 所使用的工具、Agent Loop 和上下文管理,并同时支持 Python 和 TypeScript。应用不再自己实现 while 循环,而是通过 query() 提供任务和运行选项;SDK 在内部读取文件、运行命令、修改代码,并把每轮消息和最终结果流式返回。Agent Loop 文档 对这一点有更明确的说明:模型会根据工具结果继续行动,直到完成、失败或达到限制。
这并不意味着“传入 Prompt 就自动得到一个安全的 GitHub PR”。应用仍然需要提供隔离的工作目录、权限策略、独立验证器和 GitHub 生命周期管理。SDK 解决的是一个成熟 Agent 的通用运行时,不会替应用判断某个 Issue 是否真的修复。这正好对应 Weng 对 “Harness Layer vs Core Intelligence” 的区分:模型能力决定许多问题能否被理解和解决,但 Harness 决定模型能看到什么、能做什么,以及系统如何验证结果。
5.1 用 SDK 构建 IssueFixer Agent 这里不是把一个现成 Agent 当成黑盒调用,而是用 SDK 实现自己的 IssueFixerAgent。应用仍然负责任务格式化、工作目录选择、权限策略和最终验证;SDK 负责其中通用的模型—工具循环。
1
2
3
4
5
6
7
8
9
10
11
12
13
14
15
16
17
18
19
20
21
22
23
24
25
26
27
28
29
30
31
32
33
34
35
36
37
38
39
40
41
42
43
44
45
46
47
48
49
50
51
52
53
54
55
56
57
58
59
60
61
62
63
64
65
66
67
68
69
70
71
72
73
74
75
76
77
78
79
80
81
82
83
84
85
86
87
88
89
90
91
92
93
94
95
96
97
98
99
100
101
102
103
104
105
106
107
108
109
110
111
import { createInterface } from "node:readline/promises" ;import { stdin as input, stdout as output } from "node:process" ;import { query } from "@anthropic-ai/claude-agent-sdk" ;const repoDir = process.env .REPOSITORY_DIR ?? process.cwd ();type GithubIssue = { number : number ; title : string ; body : string ; }; function formatIssue (issue: GithubIssue ): string { return [`Issue #${issue.number } :${issue.title} ` , issue.body ].join ("\n" ); } const highRiskCommand = /\bgit\s+push\b|\bgh\s+pr\s+create\b/ ;async function requestApproval (summary: string ): Promise <boolean > { const terminal = createInterface ({ input, output }); try { const answer = await terminal.question ( `\n需要审批的操作:${summary} \n输入 y 才允许继续:` , ); return answer.trim ().toLowerCase () === "y" ; } finally { terminal.close (); } } declare function verifyIssueBeforePublish (input: { issue: GithubIssue repoDir: string command: string } ): Promise <{ ok : boolean ; reason?: string }>async function runIssueFixerAgent ( issue: GithubIssue, repoDir: string , Promise <void > { for await (const message of query ({ prompt : [ "你负责在一个隔离的 GitHub 仓库工作区中修复下面的 Issue。" , formatIssue (issue), "先检查仓库规则、实现和现有测试,再定位根因。" , "修改源代码并补充回归测试,运行与变更相关的测试。" , "测试和独立验证通过后,才可以请求 git push 和 gh pr create。" , "不要通过改写命令、脚本或其他工具绕过高风险操作审批。" , ].join ("\n\n" ), options : { cwd : repoDir, allowedTools : ["Read" , "Edit" , "Glob" , "Grep" ], permissionMode : "default" , canUseTool : async (toolName, toolInput) => { if (toolName === "Bash" ) { const command = typeof toolInput.command === "string" ? toolInput.command : "" ; if (highRiskCommand.test (command)) { const verdict = await verifyIssueBeforePublish ({ issue, repoDir, command, }); if (!verdict.ok ) { return { behavior : "deny" , message : verdict.reason ?? "独立验证没有通过。" , }; } const approved = await requestApproval (command); if (!approved) { return { behavior : "deny" , message : "用户没有批准该高风险 Git 操作。" , }; } } return { behavior : "allow" , updatedInput : toolInput }; } return { behavior : "deny" , message : `工具 ${toolName} 不在这个任务的允许范围内。` , }; }, }, })) { if (message.type === "result" ) { console .log (JSON .stringify (message)); } } } await runIssueFixerAgent ( { number : 1842 , title : "空数组输入会让 /v1/items 返回 500" , body : [ "预期行为:返回 400,并给出明确的参数错误。" , "要求:补充覆盖空数组场景的回归测试。" , ].join ("\n" ), }, repoDir, );
这段代码中,SDK 接管了几件原来必须手写的事情:
根据模型决定动态调用 Read、Grep、Edit 和 Bash;
把工具调用、工具结果和下一轮模型输入串起来;
在 permissionMode: "default" 下,把未被规则自动允许的调用交给 canUseTool;
在高风险命令到达审批前,先由应用侧 verifier 检查测试、行为和 diff;
工具被拒绝时,把拒绝结果交回 Agent,让它调整方案或报告无法继续。
这里有一个容易误解的细节:allowedTools 是“自动批准这些工具”的规则,不是把 Agent 限制在这些工具中的白名单;未列出的工具仍可能进入权限判断。因此,生产配置还需要配合明确的拒绝规则、Hook、沙箱和应用侧 verifier。Claude Agent SDK 的权限文档 对 allow、deny、permissionMode 和 canUseTool 的关系有完整说明。
5.2 这个阶段比 Agent Loop 多了什么 用同一个 Issue 对比,差异可以这样看:
问题
自己实现 Agent Loop
Claude Agent SDK
下一步怎么决定
应用自己维护循环和消息协议
SDK 内部 Agent Loop 根据工具结果继续行动
文件和命令工具
应用自己实现并注册
SDK 提供内置工具
权限审批
应用自己设计拦截点
通过 permission mode、规则、Hook 和 canUseTool 配置
业务完成条件
应用自己实现
仍由应用自己的 verifier 判断
替换 Loop、Session、工具执行器
通常需要改应用代码
SDK 暴露配置和扩展点,但核心 Loop 仍由 SDK 提供
所以第四阶段的关键词是“可调用的成熟 Agent”。它把 Agent 做成了产品级 SDK,显著降低了应用接入成本;但从自我改进的角度看,更关键的问题是:IssueFixer 能沿着 SDK 的扩展点改进到哪一层?如果需要替换 Session 持久化、工具执行器、Agent Loop 或动态加载机制,就已经超出 SDK 的主要扩展面,这引出第五阶段的 DeepSeek Harness。
5.3 Claude Agent SDK 中的自我改进:能改到哪一层 Claude Agent SDK 不会自动修改自己的代码。它的价值在于把 Agent Loop、工具执行和权限处理封装起来,同时暴露一组稳定的配置和回调。IssueFixer 的开发者可以根据运行证据修改这些入口,但不能越过 SDK 直接改内部循环。
以同一个失败为例:模型修改了代码却没有补回归测试,就先改 Prompt;测试工具只返回“失败”,就通过工具输出或 PostToolUse 补充 exitCode、标准输出、标准错误和日志路径;模型在测试前请求 git push,就由 PreToolUse、canUseTool 和独立 verifier 拦截。SDK 负责把结果重新送回循环,改进策略仍由应用决定。
级别
改进对象
Claude Code / Agent SDK 中的入口
IssueFixer 示例
能否继续深入
1
Prompt
systemPrompt、项目指令文件、规则文件、任务 Prompt增加“行为修复必须配套回归测试”
可以直接修改
2
Context structure
Skill、项目规则、记忆/历史摘要和工具结果结构
注入仓库规则,整理测试命令、失败输出和历史原因
可以直接修改
3
Workflow
Sub Agent、Dynamic Workflow、任务分工和应用层编排
一个 Agent 定位根因,另一个 Agent 独立审查测试
可以编排,但不能重写 SDK 主循环
4
Harness code
.claude/settings.json 中的 Hook、PreToolUse、PostToolUse、权限规则、canUseTool在 git push 或 gh pr create 前运行 verifier
只能修改 SDK 暴露的扩展点
5
Optimizer itself
SDK 没有内置的自我改进控制器
修改“如何从失败 Issue 归因、生成候选、评测和晋升”的程序
需要 IssueFixer 应用或外部控制器负责
这里的 Prompt 和 Context 需要区分 Claude Code 与 Claude Agent SDK:在 Claude Code 中,项目根目录的 CLAUDE.md、用户级 ~/.claude/CLAUDE.md、规则文件和自动记忆文件都可以成为模型看到的文本;引入 Skill 后,上下文不再只是几段指令,而是带有触发条件、结构和复用方式的上下文单元。Agent SDK 应用是否加载这些文件,则取决于 settingSources、应用自己的读取逻辑和配置,不能把 Claude Code 的默认行为直接当成 SDK 的保证。
第五级可以直接用 IssueFixer 的自我改进过程来理解。假设系统连续遇到这样的失败:模型在测试失败后声称完成,或者测试通过了却没有覆盖 Issue 行为。前几级改进可能分别是补充 Prompt、整理测试输出、增加 Workflow 完成条件,以及在 tools/pre-execute 中加入 verifier。到了第五级,修改对象变成了“如何诊断失败、选择改动层级、生成候选、在 held-in 和 held-out Issue 上评测,并决定是否晋升或回滚”的自我改进控制器。
优化 Prompt 的程序只是这个级别的一个简化例子:如果它原来只会判断提示词应该写入 CLAUDE.md 还是规则文件,后来项目新增了 Skill,那么优化器本身也要更新候选生成和评测逻辑,判断这条经验是否更适合沉淀为 Skill。真正重要的不是某个文件名,而是优化器能否理解自己正在优化的对象已经从 Prompt 扩展到了 Context、Workflow 和 Harness code。
所以,“自我改进有了清晰落点”指的是失败可以对应到 Prompt、Context、Workflow 或 Harness code 的明确入口,并不意味着 SDK 已经具备自动自我改进能力。Claude SDK 可以让应用沿扩展点向下改进,却不能直接替换内部 Agent Loop、Turn 调度、消息协议、Session Provider 或工具执行语义。若改进目标已经超出这些扩展面,就需要回到自建 Agent Loop,或进入下一阶段的 DeepSeek Harness。
Claude Agent SDK 进程同样需要被放在受控的运行环境中。真实服务要限制工作区、网络、资源和凭据,并处理长任务恢复;官方的托管文档 也把持久进程、隔离容器和资源控制列为部署时需要考虑的问题。
六、第五阶段:DeepSeek Harness——从使用 Agent 到组装运行时 前面的 Claude Agent SDK 已经把通用的模型—工具循环封装成了 SDK。到了 DeepSeek Harness,问题又往下了一层:如果要做一个长期运行的 IssueFixer,谁负责创建 Agent,谁提供工具,谁保存 Session,谁决定哪些操作需要审批?这些能力能不能替换,而不必重写整个 Agent?
这里最容易产生误解。DeepSeek Harness 不是一个叫 IssueFixer 的“大类”,也不是调用一个函数就能自动生成 Pull Request 的产品。它更像一棵由插件组成的运行时:模型、工具、Session、Agent、Agent Loop、审批和 Web API 都安装在同一个 Cordis Context 中;应用再通过这个运行时创建一个具体 Agent,并向它投递任务。理解这类系统时,一个有用的角度是看“核心边界画在哪里”:有的框架只把循环交给开发者,有的把整个 Agent 作为产品交给开发者,而 DSH 进一步把运行时能力拆成可组合的插件。
6.1 先分清三件事:启动 Harness、创建 Agent、投递消息 以当前项目的 dsh web 为例,它的启动过程是:
1
2
3
4
5
6
dsh web → 等价于 dsh --profile web → 组合 base + web-app 的 patch → boot() 创建 Context 并挂载插件树 → 启动模型、Session、Agent Loop、工具、API Gateway 和 Web Server → 等待浏览器创建或恢复 Session
这一步创建的是 Harness 运行时,不是一个正在修 Issue 的 Agent。当前 dsh-base 的 agent-loop 配置是 agents: [],而 Web Bundle 的注释也明确说明:Web 会在客户端请求时创建 Session。
两个 Bundle 的职责可以先这样记:
Bundle
提供什么
在 IssueFixer 中对应什么
dsh-baseLLM、Session、Agent Registry、Agent Loop、Tools、文件系统、沙箱、审批和持久化等基础能力
让 Agent 有模型、有工具、有状态可运行
dsh-web-appWeb Server、API Gateway、Workspace、浏览器前端、Session 投影和 Web Runtime
让浏览器能够创建 Session、发送 prompt、显示事件和审批
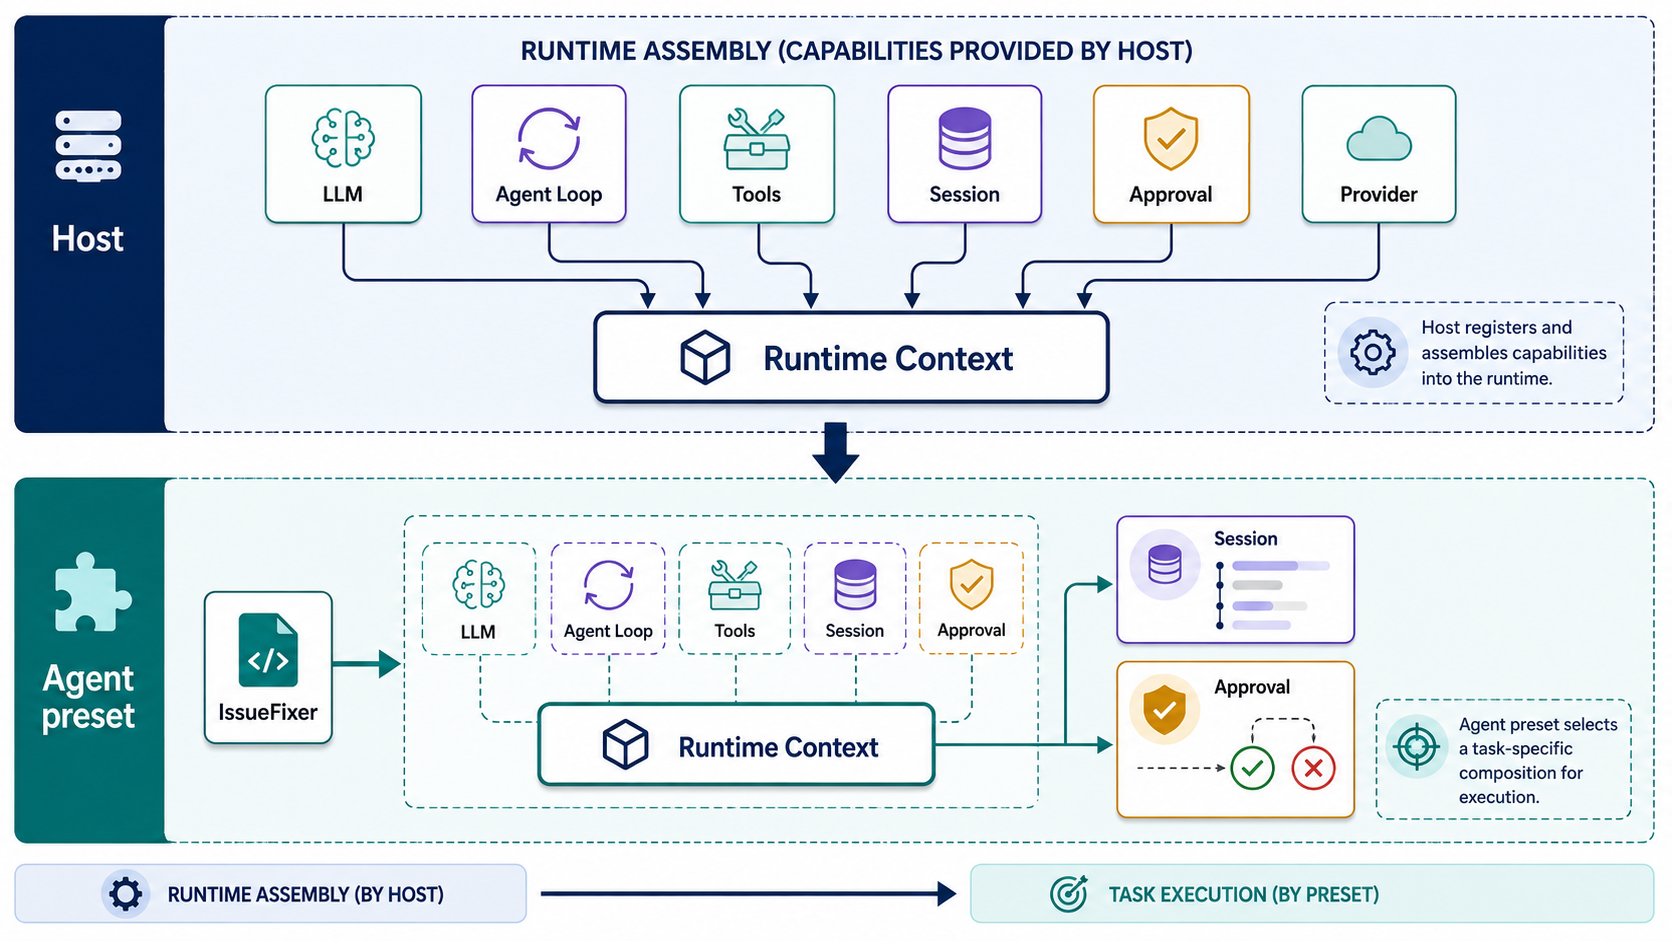
图 4:Host 先把 LLM、Agent Loop、Tools、Session、Approval 等能力装入 Runtime Context,Agent preset 再选择 IssueFixer 所需的组合并执行任务。
dsh-base 的配置可以在 base/cordis.patch.yml 看到;dsh-web-app 则在 web-app/cordis.patch.yml 中增加 API Gateway、Web Server 等宿主能力。
浏览器创建一个新会话后,服务端才会执行类似下面的动作:
1
2
3
4
5
6
session.create → ApiProxy.ensureSession() → 如果 Agent 已存在,直接复用 → 如果磁盘上有旧 Session,调用 ctx.agents.resume() → 否则调用 ctx.agents.create() → 返回 sessionId
用户随后发送 Issue:
1
2
3
4
session.prompt → ApiProxy 找到 sessionId 对应的 Agent → agent.followup(message) → Agent Loop 被唤醒
可以把它画成两条边界:
ctx.agents.create / resume
ctx.agents.create / resume
这里的 create、resume 和 followup 是三个不同的动作:
ctx.agents.create() 创建一个绑定 Session 身份的 Agent;ctx.agents.resume() 从持久化 Session 恢复 Agent;agent.followup() 向已经存在的 Agent 投递一条普通的下一轮消息。
6.2 followup 到底是什么? followup 是 @deepseek-ai/dsh-agent 暴露的 Agent API,由 @deepseek-ai/dsh-agent-loop 提供具体循环实现。它不是 DeepSeek 模型 API,也不是 Web 层的 RPC 方法。
最小用法是:
1
2
3
4
5
6
7
const message = createUserMessage ({ content : [{ type : 'text' , text : '修复 GitHub Issue #1842' }], source : { kind : 'user' }, }) agent.followup (message) await agent.whenIdle ()
它的内部含义可以简化成:
1
2
3
4
followup (message ) { inbox.nextTurn .push (message) wakeAgentLoop () }
实际源码使用统一的 send() 实现:followup() 把消息放入 next-turn 队列并唤醒驱动器;steer() 和 inject() 使用的是不同的队列和唤醒语义。具体行为见 Agent 接口 与 Agent Loop 实现 。
需要注意两点:
followup() 只负责投递任务,不负责等待任务完成,也不返回最终答案;whenIdle() 观察的是整个 Agent 达到停稳,不对应某一条消息的结果。
因此,应用通常还需要在停稳后执行:
1
2
3
await agent.whenIdle ()await ctx.sessions .flush (agent.session )const events = agent.session .events
最终是否真的修好了 Issue,应该由测试报告、工作区 diff 和独立 verifier 判断,而不是由模型最后一句“已经修复”判断。
6.3 先用项目已有 harness 跑通一条 Issue 当前项目的 examples/headless-agent/tests/harness.ts 是理解装配过程最短的入口。它是测试用的 Harness,不是生产 Web 入口,但它使用了真实的 Agent Loop、DeepSeek 适配器、Bash 工具和 JSONL Session 持久化。
把其中与 IssueFixer 有关的部分压缩后,大致是:
1
2
3
4
5
6
7
8
9
10
11
12
13
14
15
16
17
18
19
20
21
22
23
24
25
26
27
28
29
30
31
32
33
34
35
36
async function createIssueFixerRuntime ( repoDir: string , sessionRoot: string , const ctx = new Context () await mountAgentLoopTestDependencies (ctx, { systemPrompt : { persona : 'You are an IssueFixer. Verify changes with real tests.' , }, }) await ctx.plugin (AgentLoop , { agents : [] }) await ctx.plugin (LlmDeepSeek , { models : [{ id : 'deepseek-v4-flash' , contextWindow : 128000 }], }) await ctx.plugin (LocalSubprocessRuntime ) await ctx.plugin (BashEnvPlugin ) await ctx.plugin (LocalBashExecutor , { cwd : repoDir, timeoutMs : 30_000 , }) await ctx.plugin (ToolBash ) await ctx.plugin (JsonlSessionPersistence , { root : sessionRoot }) await ctx.plugin (SessionCheckpointPolicy ) return ctx }
这段代码不要按 import 顺序理解,而要按“谁提供能力、谁消费能力”理解:
代码
在 Harness 中的位置
对 IssueFixer 的意义
new Context()根运行时
还没有模型请求,也没有具体 Agent
mountAgentLoopTestDependencies()基础 Service Definition/Provider
提供 LLM、Session、Prompt、Tools 和 Agent Registry 的接口
ctx.plugin(AgentLoop)Agent Loop Provider
为 ctx.agents 注册创建和驱动 Agent 的能力
ctx.plugin(LlmDeepSeek)LLM Provider
让 Loop 可以请求 DeepSeek
LocalBashExecutor + ToolBash工具 Provider + Consumer
让模型可以检查代码、运行测试和修改仓库
JsonlSessionPersistenceSession Persistence Provider
把会话事件保存下来,支持恢复和回放
ctx.agents.create()应用入口
创建一个具体的 IssueFixer Agent
agent.followup()Agent 消息入口
真正把 Issue 交给 Loop 执行
这里尤其要注意 mountAgentLoopTestDependencies:它属于测试支持包,只是为了让测试自由控制装载顺序。生产程序不应该把测试包当成业务依赖,而应该像 dsh web 一样通过 profile 和 Bundle 装配同样的 Service。
有了这个运行时后,创建并投递一个 IssueFixer Agent 是:
1
2
3
4
5
6
7
8
9
10
11
12
13
14
15
16
17
18
19
20
21
22
23
24
25
26
27
28
29
30
31
32
33
34
35
36
37
38
39
40
41
42
type GithubIssue = { repository : string number : number title : string body : string } function issuePrompt (issue: GithubIssue ): string { return [ '你负责修复一个 GitHub Issue。' , '仓库:' + issue.repository , 'Issue #' + issue.number + ':' + issue.title , issue.body , '先检查仓库规则、定位根因,再修改代码和回归测试。' , '运行相关测试,只有完成验证后才请求创建 PR。' , ].join ('\n\n' ) } async function runIssueFixer ( ctx: Context, issue: GithubIssue, repoDir: string , const { agent } = await ctx.agents .create ({ sessionId : SessionId ('github-issue-' + issue.number ), meta : { cwd : repoDir }, agentOptions : { provider : 'deepseek-official' , model : 'deepseek-v4-flash' , }, }) agent.followup (createUserMessage ({ content : [{ type : 'text' , text : issuePrompt (issue) }], source : { kind : 'user' }, })) await agent.whenIdle () await ctx.sessions .flush (agent.session ) return agent.session .events }
这段代码还没有执行“创建 PR”。它只完成了:
1 创建运行时 → 创建 Agent → 投递 Issue → 等待停稳 → 保存 Session
代码位置和运行时位置必须分开看:
6.4 同一套能力如何变成 dsh web? 上面的 headless 示例是应用代码直接调用 DSH API。dsh web 只是把“应用入口”换成了 Web API,底层仍然使用 ctx.agents 和 agent.followup。
当前 ApiProxy 的新 Session 路径可以简化为:
1
2
3
4
5
6
7
8
9
10
11
12
13
14
15
16
17
18
19
20
async function ensureSession ( sessionId: SessionId, cwd: string , presetId?: string , Promise <Agent > { const live = ctx.agents .get (sessionId) if (live !== undefined ) return live const composition = await composeAgent (presetId) return (await ctx.agents .create ({ sessionId, meta : { cwd, agentPreset : composition.agentPreset , }, agentOptions : agentOptions (), setup : composition.setup , })).agent }
恢复旧会话时则是:
1
2
3
4
5
6
7
8
9
const inspected = await persistence.inspect (sessionId)const composition = await composeAgent ( resolveSessionPreset (inspected), ) const { agent } = await ctx.agents .resume ({ resumeSessionId : sessionId, setup : composition.setup , })
浏览器的 session.prompt 最后会走到:
1
2
3
4
5
6
7
8
const agent = await agentFor (sessionId)const message = createUserMessage ({ content, source : { kind : 'user' , rpcId }, }) agent.followup (message)
项目中的真实实现还包含 Session 持久化、preset 冲突、子 Agent 所有权、模型路由和错误映射;这里省略了这些细节,只保留最能说明调用关系的部分。可直接对照 ApiProxy 的 Session 创建代码 和 Remote Agent resolver 。
所以,如果把 IssueFixer 接到 Web 版本,浏览器侧并不需要知道 Agent 类,也不需要直接调用 followup()。它只需要调用:
1
2
3
4
5
6
7
8
9
10
11
12
13
const created = await api.sessions .create ({ cwd : '/workspace/example-service' , agentPreset : 'issue-fixer' , }) await api.sessions .prompt ({ sessionId : created.sessionId , mode : 'queue' , content : [{ type : 'text' , text : issuePrompt (issue), }], })
6.5 新增一个 DSH 插件:先决定它属于哪一层 理解“插件开发”的关键,不是先写 apply(ctx),而是先判断这项能力的生命周期和作用范围。
DSH 当前实际上有两个重要的装配面:
装配面
放什么
IssueFixer 示例
Host plane
进程或部署共享的 Provider、Registry、Session、沙箱、审批和 API
GitHub API 客户端、凭据、仓库工作区策略
Agent preset plane
某一类 Agent 面向模型的 Prompt、Tool、Skill、Workflow 和计划能力
IssueFixer 的 GitHub 工具、PR 门禁、Issue 专用规则
这也是为什么不建议把带有 issue 和 repoDir 的工具直接注册到 Web 根 ctx.tools:一个 Web 进程可以同时服务多个 Session,根级注册会让不同 Issue 共享状态。当前项目通过 Agent preset 的 setup(agentCtx) 把每个会话加入自己的 Agent 作用域;普通工具、提示词段和策略随作用域撤销。
第一步:写业务插件 下面是一个简化的 GitHub PR 插件。它同时注册一个业务工具和一条工具执行前策略,但不实现 Agent Loop,也不直接调用模型。
1
2
3
4
5
6
7
8
9
10
11
12
13
14
15
16
17
18
19
20
21
22
23
24
25
26
27
28
29
30
31
32
33
34
35
36
37
38
39
40
41
42
43
44
45
46
47
48
49
50
51
52
53
54
55
56
57
58
59
60
61
62
63
64
65
66
67
68
69
70
71
72
73
74
75
76
77
78
79
80
81
82
83
84
85
86
87
88
89
90
91
92
93
94
import type { Context } from '@deepseek-ai/cordis' import { defineTool } from '@deepseek-ai/dsh-tools' import type { PreToolDecision , ToolExecution , } from '@deepseek-ai/dsh-tools' type GithubIssue = { repository : string number : number title : string body : string } type IssueFixerConfig = { issue : GithubIssue repoDir : string } type GithubApi = { pushAndCreatePullRequest (input : { repository : string branch : string title : string body : string }): Promise <string > } function githubApi (ctx: Context ): GithubApi { const api = ctx.get ('github' ) if (api === undefined ) throw new Error ('GitHub Provider is not mounted' ) return api as GithubApi } export const name = 'issue-fixer-github' export const inject = ['tools' ] as const export function apply (ctx: Context, config: IssueFixerConfig ): void { const github = githubApi (ctx) ctx.tools .register (defineTool ({ name : 'github_create_pull_request' , description : '推送已验证的分支并创建 Pull Request。' , parameters : { branch : { type : 'string' , required : true }, title : { type : 'string' , required : true }, body : { type : 'string' , required : true }, }, output : { schema : { type : 'string' }, render : (_args, url ) => [{ type : 'text' , text : url }], }, async execute (args ) { return github.pushAndCreatePullRequest ({ repository : config.issue .repository , ...args, }) }, })) ctx.on ('tools/pre-execute' , async ( execution : ToolExecution , next : () => Promise <PreToolDecision >, ): Promise <PreToolDecision > => { if (execution.name !== 'github_create_pull_request' ) { return next () } const verdict = await verifyIssue ({ issue : config.issue , repoDir : config.repoDir , candidate : execution.arguments , }) if (!verdict.ok ) { return { kind : 'deny' , reason : verdict.reason ?? '独立验证没有通过。' , } } return { kind : 'ask' , reason : '测试和 diff 已通过,准备推送分支并创建 PR。' , } }) } declare function verifyIssue (input: { issue: GithubIssue repoDir: string candidate: unknown } ): Promise <{ ok : boolean ; reason?: string }>
这个插件对应的执行位置是:
1
2
3
4
5
6
7
模型决定调用 github_create_pull_request → tools/pre-execute → verifyIssue 检查测试、Issue 行为和 diff → deny:把失败原因返回给模型,不执行远端写入 → ask:交给 ctx.approval 请求一次性审批 → allowed-once:才执行 execute() → push 分支并创建 PR
这里故意没有在插件里手动调用 ctx.approval.request()。工具策略返回 kind: 'ask' 后,DSH 的工具流水线会把它路由到 ctx.approval;如果审批服务或回答方不存在,系统会 fail-closed。插件只负责表达“为什么需要审批”,审批交互由 Harness 的通用能力负责。
next() 也不能省略。tools/pre-execute 是 waterfall:当前插件不处理的工具必须继续交给后续策略,否则一个只想保护 PR 的插件可能误伤 Bash、文件读取等普通工具。
第二步:把插件放进 Agent 作用域 直接脚本可以在创建 Agent 时安装:
1
2
3
4
5
6
7
8
9
10
11
12
13
14
const { agent } = await ctx.agents .create ({ sessionId, meta : { cwd : repoDir }, agentOptions : { provider : 'deepseek-official' , model : 'deepseek-v4-flash' , }, setup : async (agentCtx) => { await agentCtx.plugin (IssueFixerGithubPlugin , { issue, repoDir, }) }, })
这里的 agentCtx 是当前 Agent 的作用域 Context,而不是全局根 Context。插件注册的工具、提示词和监听器只对这个 Agent 生效,Agent dispose 时也会撤销。
在 Web 产品中,更推荐把这类模型可见能力写进 Agent preset 的 agent.cordis.yml,再由 Host 的 Agent factory 在 setup(agentCtx) 中调用:
1
2
3
4
5
6
const presets = ctx.get ('agentPresets' )if (presets === undefined ) throw new Error ('agent preset roster is not mounted' )setup : async (agentCtx) => { await presets.mount (agentCtx, 'issue-fixer' ) }
preset 文件可以是:
1 2 3 4 5 6 7 8 9 10 - id: issue-fixer-github name: '@example/dsh-issue-fixer-github' config: maxPatchFiles: 20 - id: issue-fixer-instructions name: '@example/dsh-issue-fixer-instructions' config: maxBytes: 65536
当前项目的 standard agent preset 就是这种思路:模型可见的工具和 Prompt 放在 preset;Host 侧保留 Session、模型路由、沙箱、审批和各种 Registry。
第三步:让插件成为可安装的 Bundle 如果希望使用:
1 dsh plugin --profile web add @example/dsh-issue-fixer
发布的就不只是一个 apply(ctx) 文件,还需要一个带有 dsh.bundle.patch 声明的 Bundle。一个最小目录可以是:
1
2
3
4
5
@example/dsh-issue-fixer/ package.json cordis.patch.yml src/index.ts tests/
其中:
1
2
3
4
5
6
7
8
9
{ "name" : "@example/dsh-issue-fixer" , "type" : "module" , "dsh" : { "bundle" : { "patch" : "./cordis.patch.yml" } } }
cordis.patch.yml 负责把插件加入 Profile 的配置层:
1
2
3
- insert: - id: github-api name: '@example/dsh-issue-fixer-github/provider'
这两层不要混在一起:
1
2
3
4
5
6
7
8
src/index.ts 定义插件行为:注册工具、监听事件、调用 GitHub Provider cordis.patch.yml 把进程共享的 GitHub Provider 装入哪个 Profile agent.cordis.yml 把 IssueFixer 工具和门禁装入哪类 Agent
安装 Bundle 后,Profile manifest 会记录它的 Bundle 层;Bundle 成员的增删需要重启 Profile。若只是修改 Profile 或 home 的 cordis.patch.yml,则属于用户配置层,可以由当前 Web 运行时热重载。
6.6 IssueFixer 在 DSH 中的完整执行路径 现在把上面的代码和一次真实 Issue 修复重新连起来:
用户 Verifier DeepSeek Agent Loop DSH Harness Web/API GitHub 用户 Verifier DeepSeek Agent Loop DSH Harness Web/API GitHub Issue session.create ctx.agents.create / resume session.prompt agent.followup systemPrompt + Session + tools 工具调用 tools/pre-execute 检查测试、Issue 行为和 diff deny 或通过 approval.ask allowed-once 工具结果 push 分支并创建 PR 用户 Verifier DeepSeek Agent Loop DSH Harness Web/API GitHub 用户 Verifier DeepSeek Agent Loop DSH Harness Web/API GitHub Issue session.create ctx.agents.create / resume session.prompt agent.followup systemPrompt + Session + tools 工具调用 tools/pre-execute 检查测试、Issue 行为和 diff deny 或通过 approval.ask allowed-once 工具结果 push 分支并创建 PR 用项目术语看,图中的模型请求和工具调用会经过下面的事件链:
1
2
3
4
5
6
7
8
9
10
11
12
turn/start → 领取 followup 消息 → 组装 system-prompt、历史和工具 schema → agent/pre-step → ctx.llm 请求 DeepSeek → assistant/tool-call → tools/pre-execute → tools/execute → tools/post-execute → tool/result 写入 Session → step/end → 继续下一步或结束 turn
对 Issue #1842 来说,关键的业务判断只有三处:模型可以动态选择仓库检查、文件编辑和测试工具;工具结果会进入 Session,成为下一轮请求的输入;模型请求 PR 工具时,tools/pre-execute 先运行 verifier,只有 ask 获得 allowed-once 后,GitHub Provider 才执行远端写入。
这说明 IssueFixer 不是一个单点插件,而是四类代码的组合:
代码
负责什么
不应该负责什么
Issue 输入适配器
读取 GitHub Issue,转换为 Session prompt
不直接控制整个 Agent Loop
Agent preset / 工具插件
提供 Prompt、Issue 工具和模型可见能力
不绕过通用审批
Verifier
检查测试、Issue 行为、diff 和仓库状态
不相信模型自报结果
Harness Runtime
提供 Agent、Loop、Session、Tools、Approval、恢复和事件
不替应用决定 Issue 的业务语义
6.7 当前 DSH 能做到什么,还缺什么? 截至当前项目代码,DSH 已经具备实现 IssueFixer 所需的大部分运行时积木:
Cordis 插件组合和可撤销的生命周期;
ctx.agents.create()、resume() 和 Agent Registry;可替换的 Agent Loop;
ctx.llm 和 DeepSeek Provider;ctx.tools 的工具注册、参数校验、超时和执行流水线;tools/pre-execute 的 allow、deny、ask 门禁;Session 事件日志、JSONL 持久化、checkpoint 和恢复;
Agent preset、Subagent、Jobs 和 Workflow;
沙箱、权限预设和一次性用户审批;
MCP Client,用于把外部服务接入为工具。
但这些能力合在一起,仍然不等于一个已经完成的 GitHub Issue-to-PR 产品。IssueFixer 还需要自己建设:
GitHub Webhook、Issue 拉取和评论回写;
仓库 checkout、分支、凭据和 workspace 生命周期;
面向具体项目的测试发现和独立 verifier;
PR 描述、标签、reviewer 和失败重试策略;
多任务队列、超时、恢复、租约和并发控制;
针对真实 Issue 数据集的 held-out 评测;
候选 Harness 的隔离运行、版本比较、晋升和回滚。
6.8 DeepSeek Harness 的自我改进落在哪里? 到了 DeepSeek Harness,前三级仍然可以通过 Prompt、上下文和 Workflow 改进;这里真正变化的是第四级和第五级。Claude Agent SDK 主要提供 Hook 和权限回调,而 DSH 把 Tool Provider、Session、Agent Loop 等能力拆成可装配、可撤销的插件。第五级的自我改进控制器则需要建立在这些插件之上:
级别
改进对象
DSH 中的落点
IssueFixer 的例子
4
Harness code
Tool Provider、tools/pre-execute、Session、Agent Loop
改进测试反馈、审批门禁、重试和恢复
5
Optimizer itself
当前没有完整产品,需要由应用层控制器读取运行证据并驱动候选评测
根据失败 Issue、测试、diff 和 verifier 结论,决定改 Prompt、Workflow 还是 Harness 插件,并负责晋升或回滚
例如,一次 IssueFixer 运行发现模型经常在测试失败后直接声称完成,候选修改不应只改一句 Prompt,还可以比较三种方案:
1
2
3
候选 A:修改 IssueFixer persona 候选 B:让测试工具返回结构化 exitCode、stdout、stderr 和 spillPath 候选 C:在 github_create_pull_request 的 tools/pre-execute 中加入独立 verifier
评估时需要记录:
1
2
3
4
5
6
7
8
9
Session 事件 + 工作区 diff + 测试报告 + verifier 结论 + 审批记录 → 失败归因到 Prompt、Context、Workflow 或 Harness code → 在已暴露失败的任务上复测 → 在没有参与修改的 Issue 上做 held-out 评测 → 通过后生成 Harness PR
这里的自我改进控制器可以由另一个 Agent 实现,但它不能同时修改 verifier、评测数据、权限策略和自己的晋升条件。否则它可以通过放宽完成条件来制造“变好了”的假象。
因此,DSH 当前更准确的定位是:它提供了适合做自我改进实验的运行时接口,但还没有提供完整的“自动改进 Harness”控制器。应用可以替换 Prompt、工具、Workflow、Agent Loop 和部分运行时插件,也能通过 Session、审批和测试留下证据;候选版本的隔离、比较、审阅、合并和回滚,仍需由应用层建设。
这一章最重要的不是记住某个插件名,而是记住这条实现顺序:
1
2
3
4
5
6
7
8
先用 Bundle 装配运行时 → 用 Agent preset 选择模型可见能力 → 用 ctx.agents.create/resume 管理 Session 对应的 Agent → 用 agent.followup 投递 Issue → 用 Agent Loop 驱动模型和工具 → 用 verifier 判断是否真的修好 → 用 tools/pre-execute + ctx.approval 守住 PR 写入 → 用 Session 事件和测试证据评估下一版 Harness
这也是 DeepSeek Harness 和“一个带工具的 while 循环”的区别:它把可替换的能力、状态、策略和生命周期都放到了运行时中,IssueFixer 只是这些能力的一种组合。
七、时空可组合性:为什么 DSH 要把所有东西做成插件 《A Programming Paradigm for Spatiotemporal Composability 》给出了 DSH 插件模型背后的理论视角:动态组件不仅要能被组合,还要能在不同时间加入和离开,并在依赖变化时重新组织。论文把这套机制落到 Cordis 的 effect tracking、coeffect resolution、声明式组件加载、配置 reconciliation 和 hot module replacement 上。对应到 IssueFixer,问题不只是“能否注册一个 PR 工具”,还包括插件停用后副作用是否撤销、不同 Agent 的作用域是否隔离,以及替换 Loop 或 Provider 时依赖是否仍然成立。
7.1 时间可组合性:组件离开时副作用也要离开 一个插件加载后可能注册服务、工具、提示词和事件监听器。若只删除插件对象,却没有撤销这些注册,旧行为就会继续影响后面的 Issue。
DSH/Cordis 通过 ctx.effect()、ctx.on() 和注册表 disposer 管理这些关系。这里的 effect tracking 不是装饰性概念:它记录插件创建的资源和注册关系,使实验版本被停止时,工具、监听器和其他资源能够一起撤销。
在自进化场景中,流程可能是:
1
2
3
4
5
6
生成 better-loop 插件 → 挂载到隔离 Harness → 回放 20 个 Issue → 结果变差 → 停止插件并撤销注册 → 恢复原 Harness
如果副作用不能完整撤销,后一次评测就无法确定到底是哪个版本在工作。
7.2 空间可组合性:组件要能响应依赖变化 一个组件不应当把所有依赖都写死成具体实现。它需要表达“我需要什么能力”,并在这些能力出现、消失或替换时重新组织;这正是 coeffect resolution 在工程中的直观含义:组件声明依赖,运行时负责解析当前可用的提供者。
例如:
1
2
- id: agent-loop name: '@deepseek-ai/dsh-agent-loop'
id 是能力位置,name 是当前实现。未来如果替换为:
1
2
- id: agent-loop name: '@example/dsh-better-loop'
依赖 agent-loop 的其他组件不需要全部改成新包名,运行时可以按照服务依赖重新装配。
在 DSH 中,Profile 的 cordis.patch.yml 就是这种声明式装配的实际入口:Bundle patch 先组成基础树,Profile 和 home patch 再覆盖配置;配置发生变化时,Loader/HMR 根据 patch 重新协调对应的组件。它和“在业务代码里到处写 if (betterLoop)”的差别在于,候选实现的身份、依赖和生命周期都能被运行时观察。
这对 Harness 自进化的意义是:候选版本不仅可以是几行 Prompt,也可以是新的 Workflow、工具策略甚至 Loop 插件;但它必须能被明确挂载、隔离、卸载和比较。
需要注意的是,动态装卸只是必要条件,不是安全的自进化本身。当前 DSH 的 Cordis 动态工具把动态包保存在进程内存中,不会自动写入配置、提交 Git、跨重启保留或自动晋升;其沙箱是对诚实代码的隔离,不是完整的安全边界。
八、总结:从能修 Issue 到会改进修复机制 这五个阶段同时追踪两条线:IssueFixer 的行动能力,以及系统能够修改自身的深度。单次调用改 Prompt 和上下文,固定 Workflow 改步骤和完成条件,Agent Loop 开始改 Harness code;Claude Agent SDK 把其中一部分循环和权限能力封装成扩展点,DeepSeek Harness 则把更多运行时组件变成可替换对象。
因此,“自进化”不是最后才增加的一种特殊 Agent,而是每个阶段都可以发生的改进:先改输入,再改流程和运行时,最后才讨论如何改进负责提出、评测和晋升这些改动的控制器。
1
2
3
4
5
6
执行 Issue → 保存 Session、diff、测试和审批证据 → 独立 Verifier 归因 → 修改一个明确的 Prompt、Workflow 或插件 → 在已暴露失败的任务和未参与生成的任务上复测 → 通过后提交 Harness PR,否则丢弃候选
这里暂时不把“模型直接修改自身权重”当作重点。对自动修复 GitHub Issue 来说,更现实的问题是:测试是否真的覆盖了 Issue,PR 是否经过独立验证,失败能否定位到某个 Harness 组件,以及下一版机制是否在其他仓库任务上仍然可靠。DSH 已经提供了这条路线所需的运行时基础,但失败归因、held-out 评测、候选晋升和自动回滚仍需要在应用层或未来自我改进控制器中建设。
最后可以用三个问题检查一次“自我改进”是否可信:
这次 Issue 修复为什么被认为是正确的?
失败证据能否指向具体的 Prompt、Context、Workflow 或 Harness 机制?
Harness 修改后,谁批准它进入下一版本,如何证明没有变坏?
能持续回答这三个问题,Agent 才不只是一次会调用工具的模型,而是开始成为一个能够被验证、被恢复、并逐步改进的工程系统。
参考资料